Calcifer Nightlight
Over the course of this project, my teammate and I designed and fabricated a nightlight using casting and thermoforming techniques. The objective of this project was to become familiar with the design requirements and considerations of these two techniques, and create a product that could be reproduced in the range of tens to hundreds. Our team was inspired by the character Calcifer, a fire demon, from the Studio Ghibli movie Howl’s Moving Castle, and chose to produce a nightlight of Calcifer sitting on logs.

Calcifer from "Howl's Moving Castle"
Process
Our nightlight consisted of three main components: a translucent silicone flame imitating Calcifer, a urethane resin cast base plate that our electronics and Calcifer were mounted to, and a vacuum formed base made to look like logs that sat on the base plate and hid the electronics.

Final Nighlight
To make Calcifer, our first step was to create a model that we could then use to make a mold. When making a silicone mold, a typical way to do this is by 3D printing that part you want to reproduce. However, my teammate and I found that making an organic flame shape was very difficult in SolidWorks. Another software like Blender may have been better suited to this, but instead of learning an unfamiliar software, we decided to try and sculpt our model out of clay. The only critical dimension of the model was the radius of the inner hollow of the flame, which would stretch around a ring on the baseplate (made possible by using a flexible silicone). Otherwise, we simply sculpted the model according to personal taste and limited reference to the source material for Calcifer. Because both our mold and final casts would be made out of flexible silicone, we luckily did not need to consider any overhangs or draft angles.

Clay Model
Once we had our clay model, the next step was to make a silicone mold from it. We conducted a few small-scale tests and determined that letting the clay sculpture dry slightly would allow it to hold up to the silicone pour, and making sure it didn’t dry too much ensured a clean separation from the mold. We laser-cut a disassemblable custom acrylic mold box to reduce silicone wastage; however, we were still pouring a large amount of silicone, so we conducted a few more tests and confirmed that we could do the pour in several batches to accommodate the available mixing containers and vacuum chamber. We used 6 lbs of silicone to make the mold, and casted the model in five batches. Once the silicone had cured, we scooped out the still-malleable clay model (which, of course, destroyed it in the process).

Mold Making Setup

Silicone Before Curing

Clay Model Removal

Final Mold
There was one more critical component we needed before casting Calcifer - a 3D printed plug which both took up spare space in the mold to reduce the amount of silicone needed for our casts, and created the hollow which would allow Calcifer to stretch around the ring on the base plate.
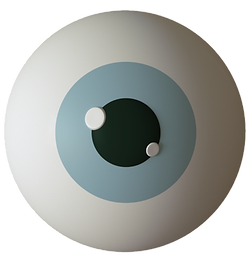
We used a transparent silicone for our casts to allow light to shine through. The casting process occurred in a few steps because we wanted the Calcifers to have eyes. First we casted the pupils with opaque black pigment, waited for them to become viscous enough that they would not flow, and repeated the process with opaque white for the rest of the eyes. This was difficult because the eyes were not on the same plane, and as a result would tend to slide towards each other. During our second time casting a Calcifer, we discovered that we could use a heat gun to set the surface of the silicone quickly, which made this process much easier.
After casting the eyes, we used the same silicone and mixed two batches with a small amount of yellow and orange pigments to keep the cast transparent. We tried using the vacuum chamber to reduce the amount of bubbles in our silicone, but the silicone was unfortunately too viscous and the vacuum chamber was not powerful enough to make a significant difference. We added the 3D printed plug after pouring the silicone. During our first time casting Calcifer, we taped the plug down to prevent it from floating, but the tape failed while the silicone was curing, so during successive cures we weighted the plug down.
The most significant problem we encountered while making Calcifer was material incompatibility. Because the mold was made with tin-cure silicone and we cast Calcifer with platinum-cure silicone, the Calcifer casts had cure inhibition on the exterior. Unfortunately, there was no way to make the casts cure properly, so we found a temporary solution in spraying them with a clear coat.
3D Printed Plug

Pouring

Curing Setup

Final Cast
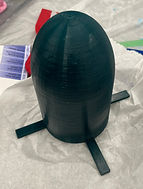
To create the log base, we first made a buck by modeling it in SolidWorks and 3D printing it. We used the buck to thermoform ABS plastic sheets into our final component. Because the log base was designed to press-fit onto the base plate, the main difficulty we encountered here was understanding the sizing of thermoformed parts. We iterated through a few scales of the buck to find a size that worked best for the press-fit. We also found that using mold release significantly helped with releasing the buck from the plastic. After thermoforming our log bases, we post-processed them by trimming away the excess plastic as needed to fit the cast Calcifer.

Log Base Buck

Plastic Log Base, Mid-Trimming
The base plate was at the center of our design: both Calcifer and the log base would sit on it, and the PCB with the LEDs and switches would be mounted to it. For simplicity, the PCB was mounted with simple through holes, and we assembled them with bolts and nuts. The size of our base plate was limited by the maximum allowable volume for urethane resin casting, and the base plate then determined the scale of all other components, including the sculpted Calcifer. We designed the base plate in SolidWorks and 3D printed it with some additional features necessary for casting: a brace to keep the model suspended in the mold box, and bosses that would make vent/pouring holes in the mold. We made these bosses all the same size to allow us to pour and vent from all four corners of the mold. As with Calcifer, we laser-cut an acrylic mold box to reduce material waste.
We poured silicone in two batches to create a two-part mold. Our first pour was up to a predetermined parting line, which we then let cure, and the second pour covered the rest of the model. We had a few issues during this process: after both parts of the mold had cured and we could separate them, we discovered large air holes against the flat face of the base plate. Because the silicone was so viscous, it did not want to level out, and we were unable to tell this issue had happened while casting. One way we could have avoided this is by using convex faces instead of flat.

3D Printed Base Plate

Casting Process

Silicone Before Curing

Final Two-Part Mold
Unfortunately, the issues with the mold were significant enough that we decided the first half was unusable. Instead, we used just the second part of the mold, which would preserve the PCB mounting features and the rim for the log base to sit on. We did lose the ring for Calcifer to sit on, which we fixed by making a model of just the ring to create a small silicone mold and casting it with urethane resin like the rest of the base plate. We then hot-glued the ring onto the base plate.

3D Printed Ring

Silicone Mold

Final Base Plate with PCB
Once we had all of our components, we set the Calcifer on the base plate and press-fit the log base on, resulting in our final nightlight assembly.

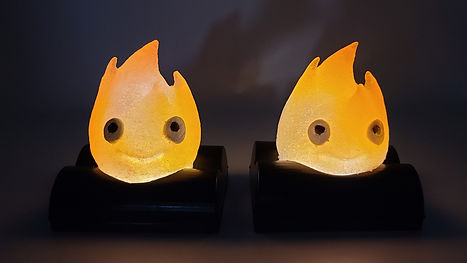
Final Nightlight Assemblies
Skills Developed
Over the course of this project, I developed/learned several skills:
1) Model design. This includes both features intrinsic to the model, such as overhangs and planning ahead to parting lines, and features added for the molding process, such as vent/pouring holes.
2) Mold design. In particular, making custom mold boxes was very valuable for conserving material.
3) Material compatibility. The cure inhibition of our silicone Calcifers was the most significant issue we encountered during this project, and in the future I will be more careful to check material compatibility.
4) Good casting practices, such as using water to check needed silicone/urethane quantities.
5) Thermoforming processes.
6) Thermoformed part design. The tolerances of our log base were very tricky to navigate since we were unfamiliar with thermoforming, and in the future we could try small-scale tests to check tolerances more easily.
Primary Challenges
1) One of the first challenges my teammate and I encountered was how to make a model of an organic shape - i.e., Calcifer. We spent several days attempting to make the flame shape in SolidWorks using various surfacing and freeform tools, but we could not get the smooth aesthetic we wanted. We realized that SolidWorks was unfortunately just not the best modeling software for organic shapes, and briefly considered using another software such as Blender, but decided to look for other solutions instead of dealing with the learning curve of a new program. Once we started thinking about using clay, we took the critical step of performing small-scale tests to ensure compatibility with the molding silicone.
2) Another difficulty we had with Calcifer, and one we unfortunately did not quite overcome, was material compatibility. The tin-cure silicone that we used to make the mold for Calcifer was not compatible with the platinum-cure transparent silicone we used for casting - which we only found out while trying to demold Calcifer and finding the outside gooey. We had done some small-scale tests of this process, but incorrectly attributed the cure inhibition to using the wrong mold release. Due to a lack of spare silicone and time constraints, neither remaking the mold nor finding a tin-cure transparent silicone was a feasible option. Instead, we tried to fix the issue retroactively in a number of ways. We tried using isopropyl alcohol and mineral spirits to wipe the uncured silicone off of the cast, and treating the mold with shellac and mold release wax to create a barrier, but none of these methods made a significant difference. Eventually, we ended up spraying the finished casts with a clear coat to at least make a barrier over the uncured silicone.
3) The third main challenge we faced was thermoforming tolerances for the log base. Neither my partner nor I were familiar with thermoforming, so this part of the project was very tricky. Since we wanted the log base to press-fit onto the base plate, the size of our thermoformed pieces was very important. We solved this problem by experimenting with the scaling of our log base buck, which was admittedly not the most efficient or sustainable solution since we had to re-3D print the buck each time. One of the ways we could have preempted this issue is by rethinking the interface between the log base and base plate so that a press-fit was unnecessary.